Showing posts with label quick. Show all posts

Friday, April 17, 2015

Whole Wheat Tortilla Chips


It's so easy to make your own healthy tortilla chips. No frying needed. You bake lightly oiled tortillas in a hot oven and you have crunchy, crispy healthy chips. Best of all, you can flavor them any way you want.

Some whole wheat tortillas are thick. These don't work as well for chips. I like the ones made for wraps. I found The Ole brand of Extreme Wellness High Fiber-Low Carb Tortilla Wraps work really well because they are very thin. All those "health" words in there are not necessary. Find a brand that is thin and whole wheat. That's what is important.

The seasoning is up to you:
  • Really simple: just salt
  • Simple and sweet: cinnamon-sugar. Equal parts ground cinnamon and sugar
  • Savory: any ground spice and salt. Blends like chili powder work well. I used a blend called Mapuche seasoning from the Savory Spicy Shop. It's based on a Chilean spice blend, and contains cumin, coriander, smoked sweet paprika and chile.
The method: heat your oven or toaster oven to 400°F. Brush or spray the tortilla with oil. Sprinkle lightly with seasonings. Cut into wedges. Place on a rack and bake for about 5 minutes. Turn them over and continue baking until crispy. Watch at the end of baking because they can burn at the edges. Store in an airtight container to keep them crisp.

Monday, January 19, 2015

Meatless Monday: Low Lactose Mac and Cheese


My lovely daughter spent 6 weeks in Southeast Asia last summer. Not a whole lot of dairy in that part of the world. At some point, she was able to get a latte chai. Little light bulb went off - maybe dairy and me don't really get along? She tolerates many cheeses because they are low in lactose. Milk and cream are chock full of the stuff. Sure, there are lactose free milks but they don't taste quite the same. Of course, neither does coconut milk but she really likes coconut milk. So, that's where this recipe came from. Many people have trouble digesting lactose so I offer this recipe to all those lactase-challenged people out there.

When shopping for a low lactose cheese, check the label for sugar. Lactose is the sugar in milk products. Cheeses that are low in sugar have very little lactose. Aged cheeses usually have low levels of lactose so a nice medium cheddar is a good choice here. Don't use processed cheese. They are very high in lactose because whey or milk (both high in lactose) are added during processing. Really, don't use processed cheese even if you can tolerate lactose. That stuff is a poor substitute for cheese, taste-wise.

If you don't have any trouble digesting lactose, you can use cow's milk in this recipe for the sauce. But, give the coconut milk a try and see what you think. Different flavor but still real good comfort food.

Saucy Stovetop Low Lactose Mac and Cheese
(serves 4)

2 cups elbow macaroni
salt for the pasta cooking water
1 ½ Tablespoons vegetable oil
2 Tablespoons all purpose flour
a pinch of powdered garlic, optional
a pinch of powdered onion, optional
¼ teaspoon dry mustard
1 ¼ cups coconut milk or other non-dairy milk
8 oz. low lactose cheese such as a medium cheddar, grated
¼ teaspoon black pepper
¼ teaspoon salt
1-2 teaspoons Tabasco or other vinegar-based hot sauce
¼ cup finely grated Parmesan cheese

Bring a pot of 3 quarts of water to a boil. Add about 1 Tablespoon kosher salt (a little less if using regular salt). When the water comes to a boil, add the macaroni. Cook until al dente, about 9 minutes. Drain well, run under cold water to stop the cooking, and set aside.

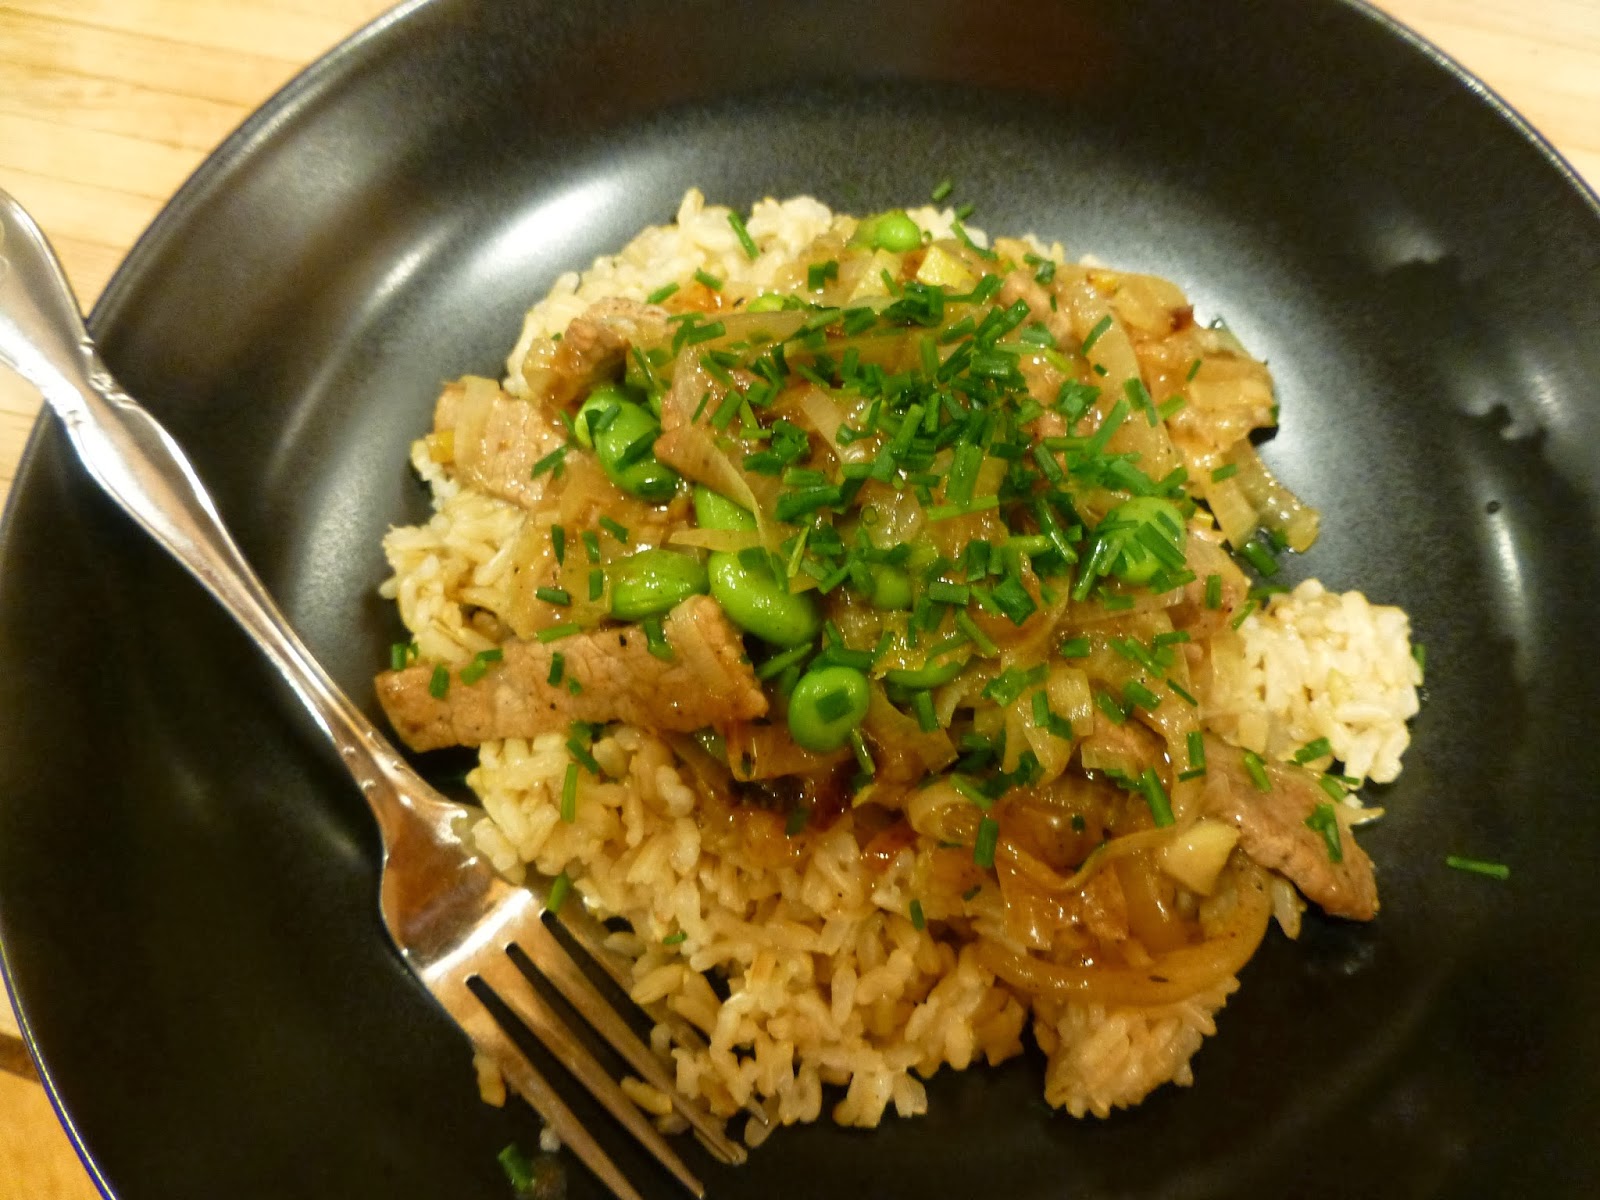
In the same pot, heat the oil over medium heat. Add the flour and cook until golden, about 4-5 minutes. Add the powdered garlic, powdered onion, and dry mustard. Stir to combine. Whisk in coconut milk. Keep whisking until sauce thickens and the sauce comes to a boil. Reduce the heat to low. Add the cheese a handful at a time, whisking to melt it after each addition. When all the cheese is added and melted, add in black pepper, salt, Tabasco, Parmesan cheese, and cooked pasta. Stir to cover all the macaroni with sauce. It will be saucy. Taste, add more black pepper, Tabasco, or salt, if desired. Serve while really hot.

Sunday, January 11, 2015

5 Ingredient Pasta Dinner


Super simple recipe but it illustrates a few things.
  • The use of ready-made ingredients, like a commercial pesto, can elevate some simple things to delicious heights and save you a bunch of time.
  • In a recipe as simple as this, you have room for improvisation. Instead of chicken, use shrimp or a firm fish that will hold together like mahi-mahi. Instead of artichoke hearts, use cubed summer squash, halved cherry tomatoes, or lightly cooked broccoli.
  • Pasta water makes a good thickener for pasta sauces. It helps the sauce stick to the pasta better and stretches out a sauce without thinning it out.
And this whole recipe takes about as long as it takes to boil water and cook pasta.

5* Ingredient Pasta Dinner
(serves 4)

12 oz. chicken breasts
salt and pepper
1 Tablespoon oil
¼ cup white wine (or use broth or water)
8 oz. frozen artichoke heart quarters, thawed
1 pound short pasta such as penne or cavatelli
4 Tablespoons pesto (homemade or commercial)

Start heating up a pot of salted water. Cut the chicken breasts into bite sized pieces and season with salt and pepper. Set aside. Heat a skillet over high heat. Add the oil, then the chicken pieces and sauté. As soon as the water boils, add the pasta and set the timer for 1 minute less than the suggested cooking time (how long depends on the shape). Cook the chicken until browned. Add the wine and scrape up any browned bits and cook until all the liquid has evaporated. Add the artichoke hearts, cover, and turn down the heat to low. When the pasta timer goes off, check to see that it is very nearly done. Scoop off a ½ cup of cooking water, then drain the pasta. Add the pasta, reserved water, and pesto to the skillet. Stir to cover the pasta with the sauce. Check for salt; add more salt if needed. Serve as soon as it is all hot.

*And, yes, I can count. I'm not counting the salt, pepper, or oil because they are pantry items. If I wanted to really push it, I'd say 4 because there is always white wine in my house. :-)

Monday, November 24, 2014

Braised Tofu and Leeks


Leeks look like giant scallions. Their flavor is milder than green onions and much milder than yellow onions. Fall is leek season - they take a long, long time to reach a good size. I grow them in my garden and I need to plant the seeds inside in January and won't start picking them until late summer/early fall. Lucky for you, leeks are available year round in supermarkets.

The big drawback for leeks is they need to be washed carefully. They are buried in soil to increase the amount of white stalk (look for leeks with a lot of white stalk - they are more tender). That soil gets in between the leaf layers. To clean them, cut off the dark green leafy top and the root end. Cut the leek lengthwise and swish energetically in dislodge the dirt. Check between the layers for hidden sand. On the plus side, they won't make you cry as much as other onions. :-)

I like to use them in Chinese dishes. Their mild flavor complements garlic and ginger. Their texture is nice in stir fries or braises. Here, I add water chestnuts and bamboo shoots, increasing the vegetable count in this one pot braise. Tofu replaces the meat for this Meatless Monday entree.

Braised Tofu and Leeks
(serves 4)

14-16 oz. firm tofu, cut into 1" cubes
2 Tablespoons vegetable oil
1 large clove garlic, minced
½ Tablespoon minced or grated ginger, about an 1" piece
1 leek, white and light green part only, washed well (see intro) and cut into 1" slices
2 cups vegetable stock (see Note)
½ teaspoon salt
1 Tablespoon soy sauce
½ teaspoon sugar
1 8 oz. can sliced water chestnuts, drained
1 8 oz. can sliced bamboo shoots, drained
1 Tablespoon cornstarch
1 Tablespoon cold water
4 Tablespoons sliced almonds, toasted, for garnish

Place the tofu cubes on a towel to soak up excess moisture.

Heat up a wok or deep skillet over high heat. Add the oil, then the garlic and ginger. Stir and add the leeks. Stir fry until the leeks wilt and start to brown in places. Add the stock, salt, soy sauce, sugar, water chestnuts, bamboo shoots, and tofu. Reduce heat to medium and cook for 4 minutes. Increase the heat to bring the stock to a boil. Dissolve the cornstarch in the cold water and add to the wok. Stir until the sauce thickens. Taste for salt. Serve over hot rice with a Tablespoon of sliced almonds for garnish.

Note: Though not vegetarian, this is excellent made with ham or chicken stock. 

Sunday, November 9, 2014

Chinese Curried Noodles


Need a recipe using the Fresh Chinese Noodles from a couple of days ago? Here you go! This is an easy stir fry that becomes a delicious saucy dish. Comes together in no time. If you have some fresh noodles stashed in the freezer, you can make dinner appear in about 15 minutes. It will taste better than anything you could find in a box or jar.

There are a couple of important general cooking facts in here:

  1. Cook the curry in oil to release its fragrance. If you add it with a bunch of liquid, this won't happen and the flavor won't be as good.
  2. Cornstarch needs to boil to activate the starches that do the thickening, so make sure you boil your sauce. Good to know for any cornstarch thickened sauce.


Chinese Curried Noodles
(serves 4 to 6)

1 pound ground meat (beef, pork, lamb, chicken, or turkey)
2 Tablespoons soy sauce
1 teaspoon + 1 ½ Tablespoons vegetable oil
1 onion, chopped
2 Tablespoons curry powder

Sauce
2 cups no or low salt chicken stock
3 ½ Tablespoons soy sauce
1 ½ teaspoons sugar
¼ teaspoon black pepper
1 ½ Tablespoons cornstarch

1 8 oz. can sliced water chestnuts, drained
1 ½ cups frozen peas or shelled edamame, thawed

1 pound fresh Chinese noodles (or ¾ pound dried fettuccine or linguine pasta)

Bring a large pot of salted water to boil.

While it's heating up, combine the ground meat with the 2 Tablespoons soy sauce. Combine all the sauce ingredients in a medium bowl and set aside.

Heat a wok or deep skillet over medium-high heat. Add 1 teaspoon of oil. Add the meat and stir fry until it is no longer pink, stirring to break up big lumps. Remove the meat to a clean bowl using a slotted spoon. If there is a lot of fat in the pan, pour it off and discard. If you are using chicken or turkey, there will be almost none.

Return the pan to high heat. Add 1 ½ Tablespoons vegetable oil. Add the onions and stir fry for 4 minutes until soft. Add the curry powder and stir fry until you can smell the curry, about 10 seconds. Stir the sauce to dissolve the cornstarch (it settles to the bottom on standing) and add to the pan. Add the water chestnuts and peas. Stir. Bring to a boil, add the meat, and reduce to a simmer. Add more salt if needed.

Cook the fresh noodles for 1-2 minutes (7-9 if using dried) until just done. Drain and add to the sauce. To serve, put noodles in a bowl with some of the sauce spooned on top.

Reheats well in the microwave.

Adapted from Asian Noodles by Nina Simonds, William Morrow and Company, Inc., 1997.

Thursday, October 30, 2014

Dan-Dan Noodles

Another recipe from my class this week, a vegetarian version of a popular street food in China. There is quite a bit of interpretation in this recipe. I'm not sure what makes it Dan-Dan noodles besides spicy (as it came out of Sichuan cuisine) and noodles. I'm even willing to drop the spicy if it gets you to try it out.

You can use fresh noodles, even Italian pasta such as fettucini or linguine. Or you can use dried Chinese egg noodles. If you are very ambitious, you can make you own egg pasta. Takes a bit of time and elbow grease rolling it out. Lots of fun and the resulting pasta has a very satisfying bite. I understand if you want this to be fast and easy, though.

Many of the recipes use stir fried ground pork. This is vegetarian, and I substituted tofu for the pork. The tofu, which is pretty bland stuff on its own, absorbs the sauce nicely, as do the noodles. My students, some who said they didn't care for tofu, declared it quite tasty.

Dan-Dan Noodles
(serves 4)

Sauce
3 Tablespoons soy sauce
1 Tablespoon cider vinegar
1 Tablespoon Asian sesame oil
1 clove garlic, minced
1 scallion, minced
1 teaspoon chile oil (optional or use more if you like hot)
1 Tablespoon vegetable oil

14-16 oz. soft tofu, cut into small cubes
½ pound fresh egg noodles or 6 oz. dried noodles
2 Tablespoons chopped roasted peanuts

In a large bowl, combine the sauce ingredients. Add the cubed tofu and gently toss so the tofu doesn't break apart.

Cook the noodles in a large pot of water until just tender. Drain and put in the bowl with the sauce. Toss to cover the noodles in the sauce. Sprinkle with chopped peanuts. When serving, use a spoon to make sure you get the tofu along with the noodles.

Wednesday, October 8, 2014

Jamie Oliver's Blushing Spaghetti Vongole


A pointer over to my other blog, World on a Platter (a link to it always appears in the right-hand margin on this blog). I'm a volunteer ambassador for Jamie Oliver's Food Revolution because I believe in real food. You can read a bit about how I, with my friend Ronnie, started up School of Eating Good on the Food Revolution site. I think Jamie and his organization do great things and I also think Jamie is a masterful chef. He just released a new book: Jamie's Comfort Food filled with comfort food recipes from around the world. There are some fun and exciting things in it, though it's not a beginner cookbook. The Blushing Spaghetti Vongole is one of the simpler recipes, but it does require getting a hold of live clams. Which aren't cheap or easy to find, particularly in landlocked Colorado*. A special meal - when you want to spoil yourself, your loved ones, celebrate something wonderful. That's what the book is about: recipes to treat the ones you love. The ones we love deserve great food and anyone can make it.

*If you live near Boulder, I recommend Pacific Ocean Marketplace on 120th Ave. in Broomfield for live clams and lots of other fishy and Asian things. You will find lots of interesting things there and some of the best deals on produce, anywhere.

Monday, July 14, 2014

Carrots and Turnips with Marsala


This recipe gives me an opportunity to introduce a few interesting ingredients:
  • Marsala wine - a fortified wine from Sicily. It has a wonderful nutty flavor. It's fairly inexpensive and because it is fortified with brandy (and sometimes sugar), it lasts forever. I used a dry Marsala, which is an aperitif, but sweet Marsala is also made and served as a dessert wine. Marsala is the primary flavoring in Zabaglione, a silky, frothy egg custard dessert, and one of the great Italian sweets.
  • Walnut oil - full of delicious walnut flavor, it can be used for cooking, as a salad oil, or as a finishing oil, like a drizzle of extra-virgin olive oil. And like extra-virgin olive oil or butter, it can handle medium-high heat cooking. A great source of healthy fats, so I like it to use it instead of butter in many recipes where the flavor of olive oil is too savory. Walnut oil is expensive, about twice as expensive as butter, which isn't exactly cheap either. But, if you can fit a bottle in your budget, and use it sparingly, it packs a lot of flavor per penny. 
  • Turnips - Not the most popular vegetable in the garden. They have an earthy flavor which is most pronounced in bigger turnips like rutabagas. I prefer the smaller purple topped turnips that show up in the Boulder Farmers' Market in early summer. From a good family, the Brassicas, which includes broccoli, cauliflower, kale, and cabbages.
We're going to put all these together with some carrots - their sweetness balances the earthiness of the turnips - to make a delicious and unusual vegetable side dish.

Carrots and Turnips with Marsala
(makes 4-6 servings)

4 medium carrots
12 oz. purple-topped turnips
2 Tablespoons walnut oil
¼ teaspoon salt
¼ cup dry Marsala
1 Tablespoon chopped fresh parsley (about 4 sprigs) or more
¼ teaspoon black pepper

Peel the carrots and turnips. Cut the carrots into thick sticks about 3" long. Cut the turnips in half and then slice into half-moons. Heat the oil in a large skillet with a cover over medium heat. Add the carrots and turnips and toss to coat in oil. Sprinkle with the salt. Cook for 5 minutes, stirring occasionally. Add the Marsala and cover the pan. Cook for another 5 minutes until the wine has evaporated and the vegetables are tender. Sprinkle with parsley and black pepper. Serve hot.

Adapted from 1000 Italian Recipes by Michele Scicolone, Wiley Publishing, Inc., 2004.

Tuesday, June 24, 2014

Sesame Spinach


Now that we have pre-washed spinach in most every supermarket, spinach is a quick and easy vegetable side dish. This dish is similar to many Asian dishes, lots of garlic, soy, and that powerhouse of flavor, Asian sesame oil. You can eat it cold too. Add a pound of stir-fried tofu cubes, serve over rice, and you have a super-quick vegetarian dinner for 4.

Sesame Spinach
(serves 4)

3 cloves garlic, minced
1 Tablespoon soy sauce
1 teaspoon sugar
1 Tablespoon vegetable oil
1 pound pre-washed spinach
½ Tablespoon sesame oil
¼ teaspoon salt
1 ½ Tablespoons sesame seeds (optional)

Combine the soy sauce and sugar in a small bowl and mix to dissolve the sugar. Heat the oil in a large skillet or wok until smoking hot. Add garlic, stir for 10 seconds, then add the spinach and toss. Continue to toss until spinach is wilted. Add soy-sugar mixture and toss again. Remove from heat. Add sesame oil, salt, and sesame seeds (if using) and toss. Serve hot, room temperature, or cold as a salad.

Monday, June 9, 2014

June Ambassador Challenge: Basil Yogurt Dressing

I used the dressing on my lunch salad: canned beans, tomato, avocado and romaine lettuce
OK, the challenge is actually to make Jamie's Buttermilk Dressing, which is quite excellent on its own. But I had neither buttermilk nor dill. But, I did have yogurt and fresh basil. Yogurt is a little tangier than buttermilk, and thicker too. It works to replace the buttermilk because it is close enough. The original recipe calls for dill but the basil was getting long in the tooth and had to go into something. And, we love basil in my house. That's a lesson for all you budding cooks out there: sometimes what you have in your fridge is good enough. Basil doesn't taste anything like dill, but it works just as well in a salad dressing. In fact, now you have one basic recipe that you can customize to what you have on hand, or what you feel like eating! The basil makes this a great dressing for a salad of sliced tomatoes.

Some ingredient notes: dry mustard can be found in any supermarket. I like Colman's, which comes in a small yellow tin. Seasoned rice vinegar is sushi vinegar, rice vinegar seasoned with salt and sugar. You can make your own, as we did for our class on sushi.

Yogurt Basil Salad Dressing
(makes enough dressing for 8-10 salads)

1 ½ teaspoon dry mustard
3 Tablespoons seasoned rice vinegar
5 Tablespoons extra-virgin olive oil
½ cup low fat plain yogurt (not Greek which is too thick)
1-2 Tablespoons milk (skim, low fat or whole)
½ teaspoon onion powder (or 1 Tablespoon finely minced onion or shallot)
1 Tablespoon minced fresh basil
1 teaspoon black pepper
1 teaspoon salt

Place everything in a jar that holds at least 1 ½ cups liquid. Shake it up really well to mix the dressing. If it seems too thick, add a little bit more milk and shake again.

The dressing will keep for a week in the fridge. Shake well each time you use it.

Tuesday, May 13, 2014

The Inner Life of Broccoli


Last summer, I read this article about a Cornell plant scientist who is trying to breed a better broccoli. Most broccoli is grown in moist, cool, foggy places, like coastal California, and doesn't tolerate warm temperatures, particularly at night. As broccoli is near the top of my favorite veggie list, I was keenly interested in his quest to breed a better broccoli, one that reaches the market sweet and crisp. Though he has successfully bred an improved broccoli, it may be a while before it reaches a market near you. Until then, is there a take-away from this work? Sure is - cook your broccoli soon after you buy it! Like that same day. No, it will not taste like fresh picked but every day it sits in your crisper is another day towards increased funkiness, something most people find off-putting about broccoli. You can steam it, chill it down quickly in ice water, drain, and refrigerate it until you need it. Heat it up in the microwave or quickly sauté it. Steaming is better at preserving nutrients than boiling, so I don't usually boil green vegetables.

Remember the stems are tasty too (in fact, they are often sweeter than the florets), but the lower stem has a thick fibrous layer that should be peeled off. Start from the bottom and pull upwards towards the florets on the thick outer layer. It will peel off in pieces. You don't need to peel all the way up; just the lower part is fibrous.

Also, learn to pick the freshest bunches: not limp and rubbery, and with tight green heads and no yellowing.

Here's a recipe, originally for asparagus, that works just as well on broccoli:

Broccoli with Goat Cheese Sauce
(serves 4, costs $2.75)

1 pound broccoli, trimmed, and cut into florets and stem pieces sliced ¼" thick
1 oz. creamy goat cheese with herbs
1 Tablespoon mayonnaise
1 teaspoon fresh lemon juice
¼ teaspoon black pepper
1 ½ Tablespoon hot water
salt

Combine goat cheese, mayonnaise, lemon juice, black pepper, and hot water in a medium bowl. Whisk until the sauce is smooth.

Steam the broccoli for about 5 minutes until just tender. Dress with sauce and sprinkle lightly with salt. Serve immediately.

Adapted from Nutrition Action.com, Asparagus with Goat Cheese and Dill Sauce


Friday, May 2, 2014

Carrots with Tequila


I don't drink much tequila but I keep it on hand because it is an excellent cooking liquid. It imparts this sweet, herbal flavor that goes so well with many ingredients, here carrots. It's also the cooking liquid in my recent mahi-mahi roasted with tomatoes. You could use wine but for Mexican cuisine, tequila just seems right. Unlike wine, it contains enough alcohol to flame. If you aren't comfortable doing this (it is quite dramatic), it's not absolutely necessary. The alcohol will evaporate, though not all of it cooks off, even if you flame it.

Some important safety tips if you want to try your hand at flaming:
  • Never pour the liquor from the bottle into the pan. If the bottle slips out of your hand, you are going to have serious trouble on your hands. Measure what you need into a measuring cup and pour from there.
  • Stand back as far as you can when you ignite the alcohol. The flames go pretty high and you don't want to be near them when that happens. And if you have anything flammable hanging over your stove, remove it before flaming.
  • It's safest to remove the pan from the heat, and use a long match to light the alcohol. If you have a gas stove, you can add the alcohol, then carefully tip the edge of the pan towards the flame to light the alcohol. It should ignite quickly.
  • You should always have a fire extinguisher in your kitchen in case of an emergency.
Carrots with Tequila
(serves 4)

1 pound carrots
2 Tablespoons butter
2 teaspoons minced fresh dill
salt and black pepper
¼ cup tequila

Cut the carrots into ¼" coins. Melt the butter over medium heat in a medium skillet with a cover. Add the carrots and toss to coat in butter. Cover the pan and cook until just tender, about 15-20 minutes. Stir once during cooking. If the carrots start to brown, turn down the heat. Add the dill, salt, and pepper. Mix seasonings in and increase the heat to high. Add the tequila and set tequila on fire. Shake pan until the flames die out, then serve.

If you don't want to set your carrots afire, only cook carrots for 10-15 minutes until still crunchy, and keep the pan heat around medium when you add the tequila. Cook the carrots in the tequila for 5 minutes to cook off some of the alcohol and finish cooking the carrots.

Monday, April 28, 2014

Simple Steamed Broccoli with Lemon


It's common to dress cooked green vegetables with lemon juice. I have a real problem with this. First, lemon juice is powerful stuff and can overpower everything and make the flavor too tart. That probably explains the generous dousing with butter or oil that follows the lemon juice. Another problem with lemon juice is its acidity. You know that dull green color that comes from overcooking green vegetables? That happens when you put an acid on green vegetables too. Ick. If you dress a big bunch of broccoli with lemon juice and don't finish it, next time you look at it, it's going to be dull green. And mushy too because the acid softens up the fiber. Double ick.

I do like the bright lemon flavor on green vegetables, however. Here's my solution: use lemon zest. You can use just lemon zest and oil. Or you can mix the lemon zest with some fresh herbs like parsley or thyme. Both of those herbs are bright, enhancing the lemon even more. If you can find lemon thyme, even more lemon! It's super easy. You can use frozen herbs instead of fresh. A light squeeze of lemon juice is nice but only for broccoli you will eat right away.

This recipe is a variation on our Simple Steamed Broccoli. At the very end, it's tossed with a bit of lemon zest. Instant lemony flavor without the overwhelming tart taste and it holds up in the fridge great.

Simple Steamed Broccoli with Lemon Zest
(serves 4-6, costs $3.13)

2 cloves of garlic, sliced thinly
1 lb. broccoli, broken into small florets and stems peeled and cut into 1/4" slices
zest of 1 lemon
1 Tablespoon fresh minced parsley or 1 teaspoon thyme leaves (optional)
2 tablespoons olive oil
¼ tsp salt, or more to taste
lemon wedges, optional

Heat 1 teaspoon olive oil in a medium saucepan or skillet with a cover over medium heat.

Add garlic and saute until fragrant but not browned. Don't burn it - it turns bitter.

Add broccoli and toss to cover with oil. Add 1 Tablespoon water,  which should immediately create a lot of steam. Cover and steam broccoli for 5-6 minutes, until crisp-tender. Try a piece after 4 minutes if you like your broccoli crisp. If it's not cooked enough, cook for another minute or two.

Sprinkle with lemon zest, remaining oil, salt, and herbs, if using. Mix to combine and serve with lemon wedges, if desired. Can be refrigerated. Excellent served cold but you may need more salt. Cold temperatures dull flavors.

Friday, April 25, 2014

Spicy Stir-fried Cucumber


Americans don't usually eat cooked cucumber. But, it's very tasty cooked, holding onto its crunch and absorbing flavors readily, like stir-fried zucchini. It cooks in a flash - just enough time to heat it up is enough.

Spicy Stir-Fried Cucumber
(serves 4, costs $2.40)

2 cucumbers
1 Tablespoon oil
½ red pepper, diced (optional; it adds nice color)
2 large cloves garlic, minced
1 teaspoon minced or grated ginger
1-2 Tablespoons minced Jalapeño chile
1 Tablespoon low-sodium soy sauce
¼ teaspoon sugar
¼ teaspoon salt

Peel the cucumbers. Cut off the very ends; they tend to be bitter. Cut the cucumber in half lengthwise and scoop out the seeds using a spoon. Cut them into 1/8's lengthwise (so cut in half again, then once more). Cut the strips into 1-1½" pieces.

Heat a wok or skillet until very hot. Add oil, ginger, garlic, and chile. Stir fry for 10 seconds, then add cucumber and red pepper. Stir fry for 1 minute. Sprinkle on soy sauce, sugar, and salt. Stir fry for 3 minutes. Serve immediately.

Note: Other spicy things - Chinese chile sauce with garlic, Siracha sauce, serranos - can be used instead if you want more spicy punch. Jalapeños are fairly tame, by chilehead standards.

Wednesday, April 16, 2014

Mahi-mahi roasted with Tomatoes


Mexico is a country of rich coastal fisheries. There is a long Pacific coastline, the Bay of California, the Gulf of Mexico and the Caribbean. Therefore, it is no surprise that there is a lot of great fish cooking going on there. Fish is probably not what most people think about first for Mexican food. Yes, fish tacos have a gained a foothold in the US but these represent Ensenada, a single Pacific city's contribution to seafood cookery (and even that has been refracted through the lens of California cooking in the US). No denying the deliciousness of Baja fish tacos but there is much more swimming in from Mexico, a country with a rich and varied cuisine.

This is a simple yet impressive dish that uses the flavors of Mexico to great advantage. Though the recipe says mahi-mahi (called dorado in Spanish speaking countries), you could use fillets of rockfish, snapper, or corvina. Mahi-mahi is a delicious meaty fish. It's very common worldwide, so it is considered sustainable.

Mahi-Mahi Roasted with Tomatoes and Cilantro
(serves 4, costs $16 when mahi-mahi is $8/lb)

4 fillets of mahi-mahi, 5-6 oz. each, skin removed
salt and black pepper
2 Tablespoons olive oil
1 bunch of scallions, thinly sliced
1 large clove garlic, minced
1 cup minced cilantro (or use parsley if you don't like cilantro)
4 large plum tomatoes, diced (or use 3 cups drained diced canned tomatoes)
¼ cup tequila mixed with ¼ cup water

Preheat oven to 450°F. Season mahi-mahi on both side with salt and pepper. Use 1 teaspoon of olive oil to grease a 9"x9" baking dish. Mix together the scallions, garlic, most of the cilantro (reserve about ¼ cup for garnish), tomatoes, ½ teaspoon salt, and ¼ teaspoon black pepper. Place ½ of the tomato mixture in the baking dish and lay the fish on top. Top with the remaining tomatoes. Drizzle with the rest of the olive oil and pour the tequila-water mixture around the fish. Bake for 20 minutes. The exact time will depend on the thickness of the fish fillets; mahi-mahi is usually 1" thick. The fish is done when it's no longer translucent and flakes easily with a fork. Garnish with cilantro and serve. Good with rice with spaghetti or roasted potatoes.

Friday, April 4, 2014

Seaweed Salad

Wakame seaweed salad. The color of seaweed varies from brown to olive green to bright green.
This one is a little unusual. Seaweed seems like a strange thing to make into a salad, but it works really well. It's slightly crunchy, quick, and fairly cheap. A little bit of dried seaweed goes a long way - it expands a lot when soaked in warm water. It absorbs water fast, so in 5 minutes, you can eat it. And unlike lettuce, you can dress it ahead and it will keep quite nicely the fridge. In fact, it gets better as the greens absorb the dressing.
Rehydrated wakame
There are many types of seaweed. The ones I like best in salad are wakame and arame (and hijiki, but high levels of arsenic have been measured in hijiki, so you probably want to avoid that one). If you have had miso soup to start a Japanese meal, you have had wakame. It's the green leaves in miso soup. Arame is a little sweeter than wakame and has more crunch. You soak the dried seaweed in warm tap water for about 5 minutes to reconstitute, rinse it off, squeeze lightly to get rid of excess water, and they're ready to go. No cooking needed. The flavor is earthy with a whiff of the ocean, like a walk along the beach. Seaweed is not particularly salty but very savory from all the minerals of the sea.

Seaweed Salad
(serves 6-8)

⅔ cup dried seaweed
1 Tablespoon soy sauce (low sodium, preferably)
2 Tablespoon natural rice vinegar (see Note)
1 teaspoon sugar
1 Tablespoon Asian sesame oil
½ - 1 Tablespoon minced fresh ginger or pickled ginger
a pinch of cayenne or a few drops of Chinese chile oil
salt to taste (none if using full sodium soy sauce)
1 Tablespoon toasted sesame seeds

Reconstitute seaweed by soaking it in warm tap water for 5 minutes. Remove any hard bits you find. Drain, rinse with cool water, and squeeze to remove excess water.

If the seaweed is in large pieces, chop it coarsely. Combine all the ingredients in a medium bowl. Serve immediately or refrigerate for up to 4 days. The seaweed will soak up more flavor as it sits.

Note: you can use seasoned rice vinegar - sushi vinegar - but don't add any sugar or salt to the salad because sushi vinegar has salt and sugar added.

Wednesday, February 12, 2014

Wilted Spinach

Looks like a lot of spinach, but really only 3 servings once it's cooked

This is the last recipe from my class last week. I hesitate to call it a recipe because it's so simple. The secret is to only wilt the spinach. It will continue to cook after you remove it from the skillet. As spinach is perfectly tasty raw in salads, you barely need to cook it. Which makes it a great vegetable for any night because it's done in a flash.

Spinach cooks down a lot. You will need 4 to 5 oz. per serving, which seems like a ridiculous amount when you see it raw, but it does the magical disappearing act when cooked.

This recipe uses a simple flavoring technique - garlic cooked in oil. Watch the garlic carefully while cooking. You want it toasted brown but not burned. Burned garlic is horribly bitter. If you burn it, you'll need to start over with new oil and garlic. We remove the garlic before tossing in the spinach. You can use the cooked garlic as garnish or discard them. 

The recipe is for 1 serving. It can be doubled, tripled, whatever you need at the time, though if you cook more than a pound of spinach, you are going to need a very large skillet! You can dump leftover cooked spinach in soup, tomato sauce, or stew but I recommend you cook only what you need at that moment. It only takes about 3 minutes. It's wonderful as a bed for our Salmon with a Potato-Scallion Crust.

Wilted Spinach
(serves 1, costs 75¢ )

1 teaspoon vegetable or olive oil
1 small clove of garlic, cut in half
4 oz. raw spinach
salt

Heat up a medium skillet over medium-high heat. Add the oil and garlic. Cook the garlic until a toasty brown all over but be careful not to burn it. It will only take a minute. Remove the garlic (reserve for garnish if you like garlic a lot or discard if you don't). Add in the spinach and toss in oil. Cook for about 1 minute until some of it starts to wilt. Season lightly with salt. Serve immediately.

Thursday, January 30, 2014

Homemade BBQ Sauce with Applejack

BBQ sauce is very easy to make. I'm not going to tell you that homemade sauce is oh, so much more healthful than the supermarket variety. However, I think it's way more tasty. Many of the bottled sauces are cloyingly sweet and they add too much smoke flavor for my taste. You can make your own and the most exotic ingredient for this one is smoke flavor. I think this recipe is really delicious, particularly on ribs (beef or pork) or dark meat chicken. Because there is a lot of sugar, brush it on near the end of cooking and then pass more warmed sauce at the table. You can also use it in an upcoming recipe for Crockpot BBQ'ed Beef and Beans.

Applejack is used to flavor this sauce as it complements the cider vinegar that gives the sauce its tang. Applejack is a brandy distilled from apple cider (French Calvados is the most esteemed of the apple brandies). Laird's, the original American applejack, has been made in Scobeyville, New Jersey since 1698. It's the oldest brandy distillery in the US, though they no longer distill in NJ. The apple brandy is now distilled in Virginia and blended in NJ. I used to live in Monmouth County, NJ and drove by the original distillery often. It's still surrounded by apple orchards that supplied the apples for a brandy that George Washington enjoyed.

Applejack BBQ Sauce
(makes about 3 cups)

1 cup applejack
1 cup ketchup
1 cup apple cider vinegar
½ medium onion, minced
2 Tablespoons Worcestershire sauce
2 Tablespoons Tabasco sauce (optional)
½ teaspoon black pepper
¼ teaspoon liquid smoke

Combine all the ingredients in a medium saucepan. Bring to a boil over medium-high heat. Lower the heat to maintain a low boil and cook until thickened, about 25-30 minutes. Stir occasionally to prevent scorching at the bottom. Sauce can be used immediately or refrigerate for up to 3 months.

Adapted from Barbecue Bible Sauces, Rubs and Marinades by Steven Raichlen, Workman Publishing Company, 2000.

Friday, January 24, 2014

Beef and Onion Stir Fry


Here's a stir fry that proves that you don't have to use Asian flavors to make a stir fry. Stir fry is a technique. Though usually associated with Chinese cuisine, who says it always has to include garlic-ginger-soy sauce in the ingredient list?

I didn't feel like Asian but I had thinly sliced beef and leeks. Huh, that sounds kind of French. OK, let's see how this turns out. Not bad!

I used eye of round that was sliced in the supermarket. Eye of round is It's not really expensive nor really cheap. The recipe only uses half a pound, so the total price stays moderate. But, you get some good beefy flavor. I added shelled soybeans (now available in the frozen food case in many supermarkets) to make up for the small portion of beef. You can use frozen green peas, which are definitely more French than soybeans. Also not French is the thickener. I use a cornstarch slurry.

Leeks can hide a lot of sand in their layers. The best way to clean them is to cut off the root end, cut off the long dark green leaves, then slice them lengthwise, and put them in a bowl of cold water. After a few minutes of soaking, swish them around a bit and rub out any dirt hiding between the layers. Then you are ready to slice them.

Beef and Onion Stir Fry
(serves 4, costs $5.50)

2 medium leeks, white and light green parts, sliced
1 medium onion, sliced
3 Tablespoons vegetable oil
1 ½ cups shelled soybeans, thawed if frozen
½ pound eye of round, sliced thinly and cut into 1" wide strips
salt and pepper
2 teaspoons cornstarch for sprinkling on beef
2 teaspoons cornstarch dissolved in 1 Tablespoon cold water
½ teaspoon dried thyme leaves, crushed
1 cup low sodium beef broth
minced chives or minced parsley, for garnish

Heat up 1 Tablespoon of oil in a large skillet or wok over medium-high heat. Add leeks and onions. Stir-fry until onions are soft and brown on the edges. Stir often to keep them from burning. Add soybeans and cook for another minute. Season with salt and pepper and remove to a bowl. Sprinkle beef with salt, pepper, and 2 teaspoons cornstarch. Wipe out the wok, and add remaining oil. Heat until smoking hot. Add beef and stir fry until browned, only takes a couple of minutes. Remove beef, leaving behind the oil, to bowl with onions. Pour off most of the oil from the wok. Return the wok to medium-high heat. Add beef broth and crushed thyme. Stir to loosen any bits sticking to the bottom of the wok. Add back onions, soybeans, and beef. Stir in cornstarch/water slurry and cook until slightly thickened. Season with salt and pepper - if using regular beef broth, taste it first. You may not need any salt. Serve with rice or noodles and garnish with fresh chives or parsley, if desired.

Wednesday, December 18, 2013

Cauliflower with Orange Sauce

By http://www.flickr.com/photos/calliope (http://www.flickr.com/photos/calliope/54833239) [CC-BY-SA-2.0 (http://creativecommons.org/licenses/by-sa/2.0) or CC-BY-2.0 (http://creativecommons.org/licenses/by/2.0)], via Wikimedia Commons
Cauliflower is one of my favorite vegetables. Unlike green vegetables, it's nearly impossible to overcook. You have to intentionally cook it to death to even make it mashable, which has become a popular preparation of late. That bullet-proof cook-ability  makes it the perfect vegetable for new cooks. You overcook broccoli and it's gross. You overcook cauliflower? It still tastes just fine.

This recipe is a riff on a richer orange sauce. That sauce contains lots of butter and it's thickened with a roux*, which explains all that butter. This is lighter, which is fine for most of us. We don't need quite that much butter - there is still some for flavor but I used a cornstarch slurry for thickening. Chinese stir fries are thickened with cornstarch, and it's a great technique for thickening sauces without a lot of fat (in fact, you could use no fat).

Though there are folks who believe that we should all eat our vegetables unadorned by fat, I find this is rather spartan. My philosophy is a little bit of tasty fat, like butter, goes a long way to making our vegetables more tasty. If that small bit of richness gets you to your vegetables, I'm all for it!

Cauliflower prices vary a bit. This week, I can get a pound for 88¢. Last week, I couldn't find it for less than $1.59/pound. The recipe cost reflects the higher price.

Cauliflower with Orange Sauce
(serves 4-6, costs $3.50)

1 head of cauliflower (about 2 pounds), cored and cut into florets
juice of 1 orange (should yield about ¼ cup juice)
1 teaspoon vegetable oil
¼ cup minced onion
2 cloves garlic, minced
¼ teaspoon ground coriander
1 teaspoon cornstarch dissolved in 1 Tablespoon cold water
½ Tablespoon butter
salt and black pepper

Bring a large pot of salted water to a boil. Cook the cauliflower for 8-10 minutes, until tender.

Meanwhile, heat the vegetable oil over medium heat. Add the onion and cook until softened. Add the garlic and coriander. Cook for another minute. Drain the cauliflower and add to the pan. Raise the heat to medium high and add the orange juice. When the juice comes to a boil, add the cornstarch+water. Boil until the sauce thickens and coats the cauliflower. Add butter, season with salt and pepper, and serve.

*Roux: flour cooked in a fat, often butter. Used as a thickener in sauces and soups like chowders and gumbos.